Yellowstone: In 2 Hours.

Have you even been so close to somewhere amazing but didn’t have the time to stop and enjoy it? This happened to us last summer which east bound on I-90. We needed to make it to Rapid City, SD by dinner time the next night in order to meet up with family for a surprise birthday party for our son. Our schedule was tight but not so tight that we couldn’t have a little fun. We had a handful of hours to spare and happen to be miles from the north entrance to Yellowstone. So, what did we do? We drove through, of course. Was it worth it? Yes!

We arrived at the entrance around dinner, ordered a pizza, walked around the village, and took the obligatory pictures by the Roosevelt Arch. We happened to head out on our drive through the park shortly before dusk. This was the beginning of our 2 hour Yellowstone tour. Here are a few reasons that these few hours were well spent!

Mammoth Hot Springs

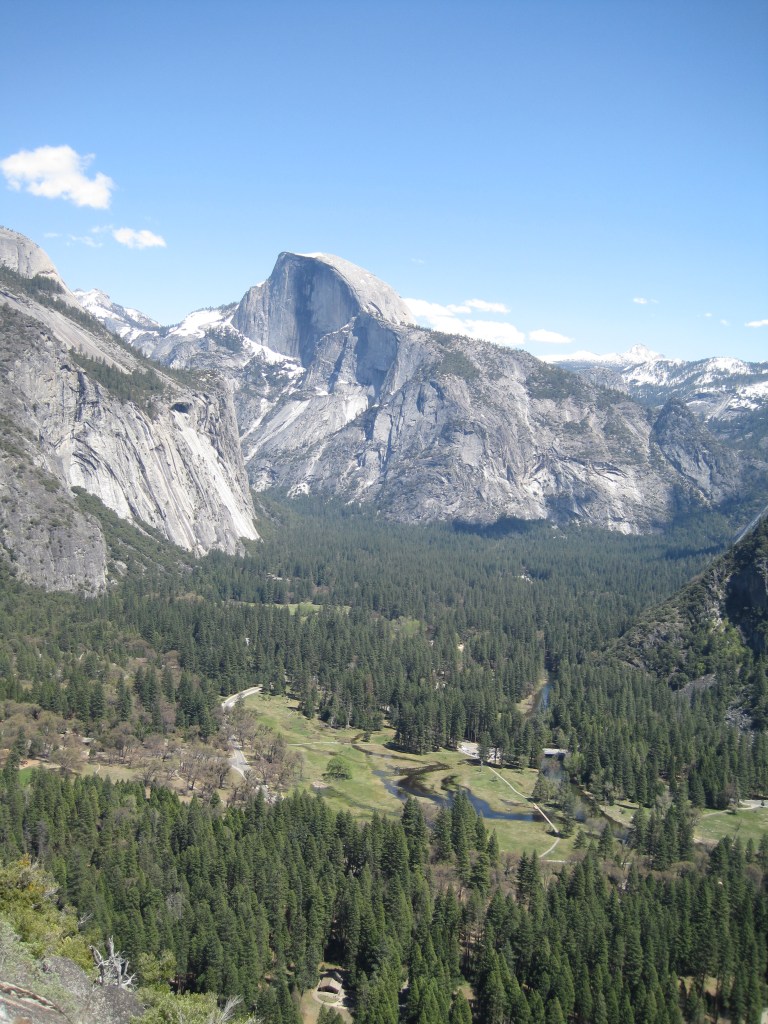
As far as site seeing goes, this one is not overrated. After dinner and early in the season we were able to see everything we wanted to see without crowds or hassles. The kids were amazed, we were reminded about its simple beauty, and everyone was happy.

Gardiner, MT

Gardiner is the type of cowboy town that kids love. Elk are everywhere. The Roosevelt Arch is welcoming. The take out pizza is great. Cold drinks are easy to find. I hope to spend a day or two there next time we travel through.

Wildlife Viewing

Our 2 hour driving tour went from Gardiner to Mammoth Hot Springs and on to Norris. From there, we headed east to Fishing Bridge and on to Cody, WY. Since we are not avid photographers and aren’t prone to taking wildlife tours, it was not immediately obvious to us that pretty much any drive through Yellowstone at dusk would offer a whole new perspective on wildlife viewing. The elk herds and black bears being pursued by tourists at the park entrance were no match for what we were about to see. (Please do not chase the wildlife by the way. We have seen this so many times and it is not appropriate! or safe.)

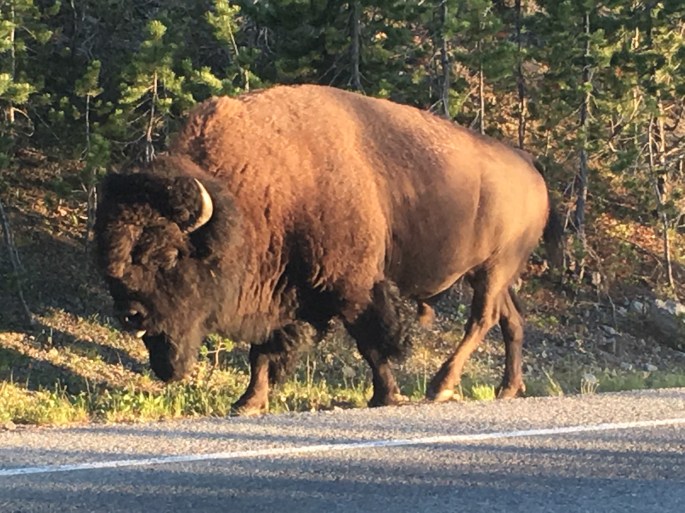
The street was lined with cars and spectators waiting for once in a lifetime experiences. We found ourselves being escorted by a herd of buffalo. Things changed from fun and interesting to amazing and unbelievable when the herd crossed the road and dropped down into a valley to swim across a fast moving river. The young buffalo were especially nerve racking to watch as I am not convinced that buffalo are not really built for swimming.

A few miles later we found the usual cars and spectators but the atmosphere had changed. Rather than sitting and looking, everyone was standing and pointing. Our van slowed to a crawl and we learned that a pack of wolves was up ahead. This was my first official wolf sighting and it was awesome! From our van, we saw a wolf running on the hill. With the help of a friendly bystander’s super powerful binoculars, I got a solid look at its face and body. I am sure it was looking at me!

Yellowstone

We made it to Cody, WY in the dark but still in good time to sleep and get ready for another day on the road. Our spontaneous 2 hour tour of Yellowstone left us inspired and wanting more! Not only did the kids stamp their National Park Passport books but they also checked out a famous hot springs, saw young buffalo swim, watched tourists chase black bears around a ranger station, ate pizza next to a field of elk, and saw their first wolf. That’s not bad for a few hour side trip!

Please like and follow our blog for more adventures.

https://ramblingfootsteps.travel.blog/2020/07/07/teddy-roosevelt-national-park-painted-canyon-trail/ https://ramblingfootsteps.travel.blog/2020/06/20/grant-kohrs-ranch-dont-miss-this-stop/

Sprinter Camper: 10 Upgrades That I Love!

Our Sprinter camper conversion benefited from the pandemic lock down. Here is a list of my 10 favorite upgrades!

1. LED lights

We added four lights. 1 goes on and off as the door is open and closed. The other three click on and off via one of two dimmer switches. One switch is over the bed and the second is behind the driver’s seat.

2. Guitar storage

Finally, a reasonable way to travel with a guitar! It hangs under the bed and over the kids bikes. Easy access and never in the way!

3. Trekking pole and kite shelf

Poles and kites run the length of the van and next to the kids bikes. They are easily removed via the back door.

4. Fishing pole holder.

This was a last minute addition and a surprise for the kids and I. I couldn’t be more happy!

Our three poles run the length of the van, on the driver’s side, over the bed.

5. Food and kitchen supply storage boxes.

You may have already seen these as they are part of our second bed set up but CD improved the efficiently of these as well. The lid of the box has recently been cut into two pieces so that I may access food at one end while sitting on the other end. Amazing!

6. Cabinets at eye level.

Check this out! We have two cabinets at eye level. One is on the driver’s side and is used for kitchen supplies. The second is on the passenger side, over the bed, and used for PJs and other daily use items. Both are secured to 8020.

7. Wood paneling.

Cedar tongue and groove gives the illusion of being in a cabin. Don’t underestimate the power of wood paneling!

8. Bike storage in our Sprinter camper

The kids bikes attach to wood and a metal bracket to slide under the bed easily. It takes less than 5 minutes to get them out and I have yet to encounter a peddle stuck in spokes or any of the other problems that I had prior to storing the bikes upright. Thank you high roof Sprinter camper!

9. Maxxair fan

Again, you may have heard us talk about this already but we installed the fan last year. Now that it is framed in, it not only works great but looks great too!

10. Rear AC wood paneling

CD framed the rear AC unit and vent with the Cedar tongue and groove. I don’t know how he did it but I am glad he did. It looks amazing!

Please join our blog!

5 Tips for Starting Your Sprinter Camper Make-Over.
Sprinter Roof Rails Self Installation: 12 Easy Steps.

Traveling During A Pandemic: 8 Things to Consider.

We drive from Oregon to Ontario and back each summer. Typically, we spent several weeks on the road and explore everywhere from British Columbia to Colorado. This year is different. We are in Colorado, halfway to Michigan. Here are some reflections from the first half of our trip: 8 things to consider when traveling during a pandemic.

1. Camping is more complicated than usual when traveling during a pandemic.

The first night on the road: Campground #1 was closed. The local Walmart did not allow overnight parking. Campground #2 was full but we drove in anyway and the camp host pointed us towards a spot that was open due to a cancellation. We felt so lucky! In the morning was drove to the day use area and it was pretty much full. We were able to snag a spot to the side and hike in an area away from the river.

Tumalo State Park, Bend, Oregon

The second night we were in Utah. I cannot speak to the situation at Utah State Parks because we arrived in Ogden around 10:30 and Utah State Park campgrounds close and lock gates at 10 pm.

We broke one of our own unwritten rules and ended up at a KOA. Again, we were lucky! It was barely occupied, clean, spacious, and had affordable tent sites for our van. It was pouring rain and we were lucky to be self sufficient.

The third night we opted to stop driving at around dinner time. We were at Dinosaur National Monument and stayed at the campground. It was easy and great. The hosts came over to welcome us, which would have been great if they had been wearing masks. Overall, it was still a hit!

Dinosaur National Monument

2. Be prepared to be amazed and scared.

We left a highly mask and social distancing compliant town in Oregon in order to travel and see our families. It turns out that the rest of the world is going on with their lives and not necessarily very compliant.

I was almost immediately shocked by the lack of masks compliance. We haven’t been in any stores or even gas stations but I have been watching people go in and out of places as we drive through. We spotted 1 mask the entire time we were in Utah. Eastern Oregon was the same. Steamboat Springs and Summit County Colorado were a bit better but, overall, I was horrified and a bit scared.

3. Bring more food and drinks than usual.

I packed food and drinks for weeks. This includes snack size bags of chips, M & Ms, Diet Coke, Gatorade, and all the provisions that you would usually run into a gas station to pick up. We have not been in a gas station or store and do not intend to change that.

4. Consider a camping conversion that includes a toilet.

Again, we have not been into gas stations, campground bathrooms, stores or restaurants. This is probably self explanatory.

5. You may feel guilty at times.

I find myself feeling like I need to justify why we are traveling.

During a remote work meeting while on the road, I felt the need to explain why we chose to travel and every precaution we are taking. I did not do that but I still want to call the people in that meeting and tell them all about it.

It is easy to find myself reviewing these points in my own mind in order to justify this trip.

6. You may find yourself judging others while traveling during a pandemic.

I find myself judging other people behaviors which is kind of funny because they could be judging me as I drive by with my out of state plates.

A playground full of mask-less adults and kids without social distancing while driving through Salt Lake City had me judging them for sure. I am aware that this is neither appropriate nor helpful.

7. Empty parking lots are more appealing than ever before.

CD and the kids spent two hours in a National Forest Service Parking lot in Utah. I was on a phone call and they set up hammocks and cooked lunch. They were happy.

Traveling during a pandemic

I cooked lunch on a our camping table in the parking lot of an abandoned department store in Idaho. We ran laps to the lamp post and back. It wasn’t our usual picturesque lunch at a park or splash pad but it was okay.

8. You will wonder if traveling during a pandemic was the right choice.

This is impossible to know. We will just do our best to keep clear minds and hearts.

Please like and follow our blog!

https://ramblingfootsteps.travel.blog/2020/06/20/dinosaur-national-monument-5-things-to-know/ https://ramblingfootsteps.travel.blog/2020/06/14/packing-for-a-pandemic-road-trip/
Advertisements
Advertisements

Dinosaur National Monument: 5 Things to Know

I have been to every National Park in southern Utah. Most, more than once. I had never been to Dinosaur National Monument. It felt out of the way from I-80 and I prefer I-70 through Utah.

I enjoy southern Utah so much that once I hit Utah, going south feels like the only options. Everything is different this year, however. We are taking our annual road trip, despite the current pandemic, because we have the opportunity to see our families. Since everything is different and I love Steamboat Springs, we opted for highway 40 from Salt Lake City.

Dinosaur National Monument’s west entrance is at very close proximity to this route. When we got there, I could not have been more surprised and amazed! The scenery is beautiful. It reminds me a bit of Moab but far less populated. We accessed the visitor’s center, hikes, and a campground on the Green River all within 10 miles of the highway and in a 15 minute drive. Here are 8 things to know that I didn’t know until this week.

1. Dinosaur National Monument is not as far out the way as it may seem.

It is on the way if you happen to be on highway 40 between Heber City, Utah and Steamboat Springs, Colorado. The west entrance visitor’s center is less than 10 miles from the highway, hikes, and the campground are a few miles beyond.

There are other entrances but we did not explore those on this trip and cannot speak to those. In looking at the map, they clearly seem further from the highway and more difficult to access than the Jensen, Utah entrance. The Quarry Visitor’s Center was well attended but we chose to bypass it in light of the current pandemic.

2. It offers plenty of river sports.

The Green River and its largest tributary, the Yampa River, run through the park before heading south to meet the Colorado in south of Moab.

Whether you prefer to hire a commercial guide or apply for a private permit, the rafting is guaranteed to be an adventure!

If rafting isn’t in your plans, bring your fishing pole, swimsuit, and picnic supplies and settle into a spot on the river bank.

3. The hiking is diverse and accessible.

I have been to tons of National Parks and Monuments and done many, many hikes. Less than two miles from the visitor’s center and on the way to our campground, we stumbled upon one of the most diverse hikes that I have seen.

The Sound of Silence trail is a 3.2 mile loop, rated moderate to difficult. It starts in a dry river bed, winds up and over various rock layers and through narrow washes. We walked in and out the first mile at sunset just after we arrived at the park and then returned the next morning for the full loop. I was not disappointed! Bring a hat (there isn’t any shade), sunscreen, water, and decent shoes. You will get dusty and hot. The trail is well marked and would be nearly impossible to follow with out the markings.

Advertisements

Advertisements

4. The views are different than you may expect.

Red, green, white, and shades of brown are all mixed together. Red rock stands against white, with valleys and high hills.

5. The campgrounds are easy to find, clean, and enjoyable.

From the Jensen, Utah entrance, there are 2 campgrounds within 10 miles. We chose Green River and it was perfect for what we needed. It was easy to get to and did not require tons of extra driving. It is on the edge of the river and offers a variety of campsites. We followed a trail to a sandy river bank, climbed a steep hill side, made friends with a resident chipmunk, and spotted tons of lizards. There is potable water, toilets and picnic tables. Not every site had shade. Some sites were smaller than others and none were fully exposed to the river but for our purposes and camping in our Sprinter, it was a good fit. The location sealed the deal for sure!

Dinosaur National Monument has much more to offer than just fossils and is easier to access than you may think. Get out there and enjoy!

Please like and follow our blog for more adventures!

https://ramblingfootsteps.travel.blog/2020/04/21/throwback-blog-series-a-tour-of-utah/ https://ramblingfootsteps.travel.blog/2020/06/07/florissant-fossil-beds-6-reasons-to-check-it-out/

Packing for a Pandemic Road Trip.

I never expected to be writing about packing for a pandemic road trip. I consider packing to be a highly subjective and personal topic. Everyone has different preferences and techniques for packing based on their needs.

So, here I am, mid pandemic, packing for our annual cross country road trip.

Below are 5 ways that Covid 19 is changing our trip.

1. Food. Much More Food.

We cook nearly all of our meals at the van and have been surprised how many beautiful and out of the way spots we have found only because we wanted to cook lunch.

With that being said, we also love fresh fruits, local food, and finding reasons to get out of the van mid-road trip. Over the years, I have learned to pack less food and stop more often. We enjoy checking out fruit stands and local grocery stores. We stretch our legs, soak up the culture, and buy food often during our trips.

This time, however, I have been stock piling food. Costco, Safeway, and homemade cookie baking have supplied enough food to live in our van for weeks. To CD’s dismay, I have even resorted to 54 single serving bags of chips, granola bars, drink boxes, and even a few bottles of water. I basically made my own convenience store in the back of our Sprinter. We will see how far it gets us!

2. Clorox Wipes and Hand Sanitizer.

While I like to keep things clean, I am not prone to wiping things down all day long. We use water with a spigot and a bar of soap to wash our hands before we eat. I typically carry one tiny bottle of hand sanitizer for emergencies. This time I packed two containers of Clorox wipes, two large bottles and three small bottles of hand sanitizer. I still have the bar of soap but that just didn’t seem like it would cut it. We will see.

3. Masks.

I didn’t see this one coming. I have two adult makes with ties, two adult masks with elastic, two kids masks with ties, two adult N95s, two kids N95s, and a bit of anxiety. As a health care provider, I hope that we don’t get into a situation that seems like it requires a N95. Wish us luck.

4. Luggable Loo And Extra Accessories.

The Luggable Loo is our potty of choice. I use biodegradable bags and poo powder. I have not typically bought extras. This time I did.

5. Guitar.

Okay, this isn’t new but it seems like a good idea when faced with a socially distant pandemic road trip. I can already hear the music.

Please follow our blog to hear about our trip!

Advertisements
Advertisements
Sprinter Camping Shopping List: Stocking Stuffers. Sprinter DIY
Not your average dresser.
Fresh food. This time it may look more like empty chip bags and mac and cheese but we shouldn’t be hungry.

5 Tips for Starting Your Sprinter Camper Make-Over.

We have been home since mid-March. Our pandemic projects include sour dough bread making, teaching home school, and continuing work on our Sprinter camper. CD’s progress with the Sprinter has been the most successful of the three.

Roof rails are installed, LED lights are wired to a dimmer switch, cedar tongue and groove is in place, and two new cabinets are ready to be filled.

Writing guides for each of this projects will take a me a bit of time but while I work on that, CD offered his top 5 tips for our diving into a Sprinter camper project.

Sneak peek! I can’t wait to share more.

1. Accept gaps in wood spacing or make custom pieces.

CD chose to custom cut each piece of wood. Time was not of the essence.

2. Realize that your Sprinter is not square.

No matter how square things start out, your van is not square.

3. Create things with wiggle room.

Plan on fine adjustments and be flexible.

4. Consider both your ideal end product and your acceptable end product.

Decide which of these you are working towards.

5. Be honest about your timelines.

Realize that your acceptable product will likely take as long you thought your ideal product would. Set out to make your ideal product and you may end up with your good enough one. If you are set on your ideal product, plan to increase your time spent ten fold and have plenty of extra wood on hand.

Have Fun With Your Sprinter Camper!

Please sign up for our blog to track for step by step guides and share in the fun!

https://ramblingfootsteps.travel.blog/2020/05/23/sprinter-roof-rails-self-installation-12-easy-steps/ https://ramblingfootsteps.travel.blog/2019/12/11/sprinter-shopping-list-stocking-stuffer-edition/ https://ramblingfootsteps.travel.blog/2020/03/26/not-your-average-dresser/ https://ramblingfootsteps.travel.blog/2019/12/14/sprinter-diy-low-roof-vs-high-roof/
Advertisements
Advertisements

Here is great source for van campers! Check it out!

DIY Promaster Camper Conversion Guide – Part I

Sprinter Camper Conversion: Amenities

Our first Sprinter camper conversion was a 2012 low roof passenger van with limited amenities. It didn’t work out.

We are a family of four and stand by our decision to camp and travel in a passenger van but our decision to start with a low roof van was ill informed and flawed.

5 reasons why we chose a low roof Sprinter:

  1. It would be a more practical daily driver.
  2. We could drive under bridges, park in parking garages, or go through a drive thru.
  3. Additional vertical space wouldn’t offer additional benefits.
  4. The kids can stand up and I can nearly stand up.
  5. It cost less.

5 reasons why this reasoning was flawed:

  1. A low roof and a high roof are essentially the same when using as a daily driver.
  2. Parking in a parking garage, going through a drive thru, or driving under some bridges may not be possible in either Sprinter.
  3. Vertical space adds many more storage options!
  4. I really want to stand up. Oh, my aching back!
  5. The low roof initially cost less but we lost any initial savings when we sold it four months later.

All about us.

  • We are a family of four, including two kids under 10.
  • More days are spent driving than camping.
  • We love windows!
  • CD is 6′ tall and I am 5’8″. We are both over 40 and maybe not as flexible as we once were.
  • Sometimes we stop along the road just to hang out in the van.
  • Money is a consideration but we would rather spend a bit more to have a van that suits us than have an aching back and a cluttered van.
Our high roof Sprinter with some fun amenities.
Advertisements
Advertisements

Passenger Van: Pros and Cons

Pros:

Windows!

  • The kids can see.
  • Improved visual field when driving.
  • We can see if the kids are in the van from outside.
  • Sunsets!

Cons:

Windows.

  • People can see in from outside. It doesn’t bother me really but it is worth being aware.
  • We spent a few hours and a little money making curtains. Each day we spend a little time putting up and taking down curtains.

Seats

  • Safe seats for the kids.
  • Seats for family members and friends.

Seats

  • Spare seats take up garage space.
  • The spare seats are not easily removed and re-installed.
Sprinter amenities. Seats anyone?

Other Sprinter Amenities: Blind Spot Monitor, Electric Running Board, and Cross Wind Assist

These are things that our first van did not have. Do we enjoy these features?

Yes!

Blind spot monitor: changes my experience every day!

Electric running board: a bench, a welcome mat, a table, and a reminder to close the door fully.

Cross wind assist: We think it actually helps.

Thoughts on rear AC.

Rear AC: It cools the van to arctic temperatures, even on the hottest days. Luckily, it cools all the way to the front as the main AC isn’t very effective. I sometimes walk to the back and realize that the kids need blankets while I am just right. We debate its importance each time we look at solar panels for our roof but then re-affirm our need for it each summer. Our solar panels will work around it and our Maxxair fan fit just fine.

Please follow our blog and our Sprinter adventures!

Sprinter Roof Rails Self Installation: 12 Easy Steps.
How do you know when family van life has gone off the rails?

For other insight on choosing a van, check out this article!

What Is The Best Vehicle To Live In?

Leavenworth Washington In An Afternoon

We took a side trip to Leavenworth from our road trip northbound on Washington 97.

Was it worth it? Absolutely!

4 Things To Know For Your First Time In Leavenworth Washington

  1. The town center is basically a Bavarian Village.
  2. Every season is tourist season in Leavenworth. Parking may be an issue and it helps to be patient your first time visiting.
  3. It is on the edge of the North Cascades and the scenery is straight out of a magazine.
  4. While it is great to spend an afternoon there, a week would be even better!

3 Things To Do On A Summer Afternoon in Leavenworth Washington

  1. Eat. Even if you aren’t hungry, this town calls you to eat and drink. Food is everywhere, including brats, beer, and everything German.

2. Walk downtown. Window shop and soak in the culture.

We walked on our own but saw several groups of guided walking tours. It sounds like Leavenworth may have some interesting history to share.

View to the West. Leavenworth, Washington.

3. Spend some time at Waterfronk Park.

Walk a few blocks downhill from town and you will arrive at Waterfront Park. The Wenatchee river’s inviting swimming holes and beautiful scenery are made even more fun by a festive parade of tubes and kayaks.

Bring a snack and you could stay all day!

Waterfront Park, Leavenworth, Washington

2 Circumstances That Lead To Staying At Wenatchee Confluence State Park

  1. Leavenworth is at capacity and you don’t have a reservation.
  2. You are headed northbound on 97 and just passing through.

7 Reasons To Love Staying at Wenatchee Confluence State Park

  1. It is approximately 30 minutes from Leavenworth.
  2. You may get lucky and get a deal! We arrived around dinner time. The park was full but they sometimes allow “overflow” parking for a fraction of the price! We scored a lake side spot with flush toilets, hot showers, bike path access, a beach, and a playground!

3. Flush toilets and hot showers.

4. A playground and picnic tables.

5. Open green space.

6. A beach.

7. Apple Capital Loop Trail.

We rode our bikes on miles and miles of this trail. It circles the Columbia River with 22 miles of paved trail. The trail can be used to connect Wenatchee Confluence State Park with Horan Nature Area, Walla Walla Point Park, and Wenatchee Riverfront Park.

We spend most of a day that was intended for driving, riding this trail and I would do it again.

Please like and follow our blog for more adventures!

6 Great Surprises along the Trans-Canada Highway.
Waterton Lakes National Park in 1 Day.

Sprinter Roof Rails Self Installation: 12 Easy Steps.

Disclosure: Please note that this post contains affiliate links. This means that we may get a small commission if you click a link and purchase something that we recommend. Clicking these links will not cost you extra money but will help us grow our website. Thank you for your support!

Are you looking for a DIY alternative to Sprinter factory roof rails? If so, we can help.

Check out our step by step guide to self installation of roof rails in your Sprinter camper. Enjoy!

Supplies:

  • Part no. 1575 from 8020.net (for the roof rails themselves)
  • Heat gun, rented from local hardware store
  • Round file
  • 5/16″ counter sink bit
  • Drill Press, borrowed from a neighbor
  • 5/16″-18 flat head bolts, 1 inch long
  • 5/16″-18 nuts
  • 5/16″ Fender washers
  • 5/16″ Lock washers
  • Loctite
  • 3 in 1 oil
  • Butyl tape
  • Ladder
  • Safety glasses

Total cost in 2020 was under $150 (excluding items we already had or borrowed)

Step 1

Make a jig for using with the drill press.

This is dependent on the drill press or equipment that you are using. I do not claim to be an expert on this but here is a picture of what we used.

Notice that the green tape and block dots are for alignment and so that if I remove the jig, I can put it back in the same spot.
Jig for drill press

Step 2

Place the 8020 on its side on top of the van and mark the 8020 at the center of each plug.

We used a mechanical pencil in order to have a very specific line for reference.

Step 3

Use 3 in 1 oil to lubricate each drill site on the 8020.

Step 4

Align 8020 in the jig and drill it at each line.

Consider looking in your drill manual in order to set it to the correct speed.

Step 5

Check the weather report for rain. If the weather looks promising prepare the 8020 and get ready to remove the plugs from the roof.

Step 6

Use the heat gun to soften the glue and remove the plugs one by one.

A second person can help by pushing the plugs from inside the van. Be aware that the plugs and surrounding metal will be hot!

Heat gun removing plugs from roof
Plug from roof
Hole from roof plug

Step 7

Clean the roof but be aware that by the time you get up there with the 8020, it will be dusty again!

Step 8

Dry fit the 8020 and bolts on the Sprinter roof.

Use a round file if fine adjustments are needed.

Step 9

Line the 8020 with butyl tape. Be aware that the front and back of van have a slight curvature so you may need to double layer the butyl tape at the ends.

Additionally, be aware that your local hardware store may try to substitute putty for butyl tape. Stick with real butyl tape. There is a huge difference!

We ended up ordering more butyl tape online and waiting two days with holes in our roof because we ran out and could only get putty tape locally. This was less than ideal!

Step 10

Using butyl tape, line the 5/16-18 screws and the 8020 drill holes in order to fill any potential gaps during installation.

Sprinter roof rails
Butyl tape on 8020 roof rails

Step 11

With the 8020 on the roof, poke a hole through the butyl tape with a nail.

roof rail DIY

Step 12: Sprinter Roof Rails

Apply bolts and hardware and tighten. A second person may help by holding the hardware from the inside of the van.

working on the sprinter camping conversion

Sprinter Roof Rails, Installation Complete!

Congratulate yourself on another Sprinter DIY project complete!

Please follow our blog for other Sprinter tips and adventures!

Sprinter Camping Shopping List: Stocking Stuffers. Sprinter DIY
Sleeping 4 in a Sprinter 144. Sprinter DIY camping conversion.
What exactly is stored under the kids seats?
Child Carrier For Hiking: Our Recommendation
Advertisements
Advertisements

For further tips on installation we found the following blog helpful, as well.

How to Install Roof Rails to Your Sprinter Van

Throwback Blog Series: Camp 4, Yosemite.

Do you dream about sleeping among the granite rock walls of the Yosemite valley?

Yosemite is impressive and beautiful.

We arrived in CD’s Honda civic. We had come from Colorado via Utah, Nevada, Southern California, and Highway 101. The mountains were a welcomed site. We were road weary and our legs were begging to hike all day.

We rolled into Camp 4. I can’t remember if we were seeking Camp 4 or if we just needed somewhere interesting to camp.

Camp 4 isn’t just a campground, it is a community. It is more of a lifestyle choice than a housing choice. It is a famous home base for climbers and is even listed on the National Register of Historic places.

It was $6 per person per night. There are 30 some walk – in sites. There are rocks for bouldering, granite mountain sides for climbing, and trailheads for hiking.

We were greeted with a list of rules. You must remove all food from your car and place in designated lockers. Camp 4 is loved by bears almost as much as by climbers.

We followed all of the recommended procedures. I cleaned the car, used the bear lockers, kept a clean campsite, and properly disposed of my dish water.

I convinced CD to use our largest tent. I don’t know why we packed this way but we had CD’s sleeping tarp from the PCT, a new backpacking tent, and my old six person tent. It seemed logical that I would be less likely to be mauled by a bear in a six person tent than in a two person tent. CD went along with it.

The bears showed up at dusk, right on schedule. You could hear the classic: “hey bear” and “get out of here, bear”. The bears didn’t seem concerned by this and neither did the campers.

The campground was relatively rowdy and a bit messy. Chip bags and beer cans were rolling around. Nobody really cared. Everyone was happy.
We passed by tons of climbers on our way to the trail.

A few hours later, the climbers from Camp 4 were below us and this was the view we found.

Ultimately, I slept with one eye open but still felt rested. I reaped the benefits of being surrounded by free-spirits. People were having fun and it showed.

Will I stay at Camp 4 again? It is unlikely. They don’t allow sleeping in the parking lot and the sites are not accessible to our van. If we ever sell the van, I will likely be too old and spoiled to sleep on the ground in Camp 4. – but who knows.

As John Muir said: “And into the forest I go, to lose my mind and find my soul”.